


As a continuation from part 1 of the cilium, Let’s discuss more cilium multi-cluster mesh and its capabilities.
What is Cilium Mesh?
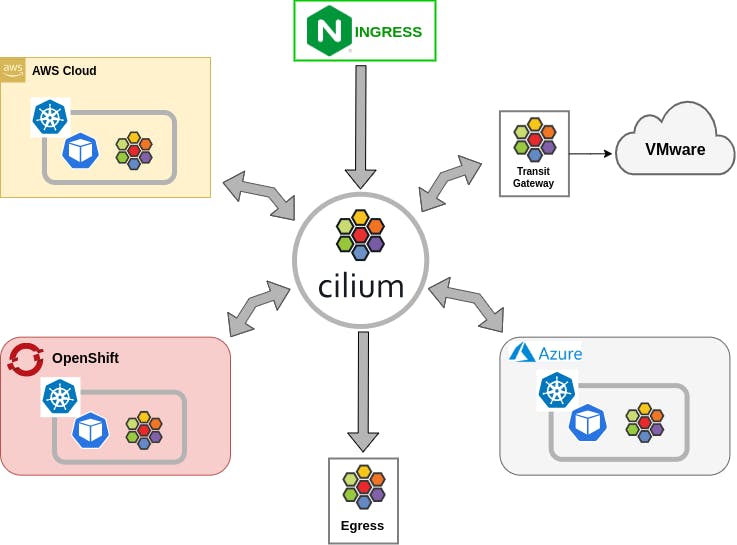
A new global networking layer called Cilium Mesh connects machines and workloads on-premises, in the cloud, and at the edge. It is composed of a transit gateway to interface with pre-existing networks, a multi-cluster connectivity plane (Cluster Mesh), and a Kubernetes networking component (CNI).
What does it do?
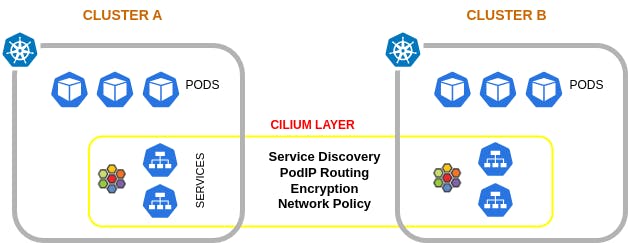
Pod IP routing across multiple Kubernetes clusters at native performance via tunnelling or direct routing without requiring any gateways or proxies.
Transparent service discovery with standard Kubernetes services and core-dns/kube-dns.
Network policy enforcement spanning multiple clusters. Policies can be specified as Kubernetes NetworkPolicy resource or the extended CiliumNetworkPolicy CRD.
Transparent encryption for all communication between nodes in the local cluster as well as across cluster boundaries.
Major Use Cases
Service Discovery and Load balancing

You need to have a functioning cluster mesh setup to achieve this feature
You have to create a service on each cluster which you want to connect
apiVersion: v1
kind: Service
metadata:
  name: rebel-base
  annotations:
    service.cilium.io/global: "true"
    service.cilium.io/shared: "false"
spec:
  type: ClusterIP
  ports:
  - port: 80
  selector:
    name: rebel-base
You can see there are two annotations added in the above Service file.service.cilium.io/global: "true" makes the cluster services a global service and all the services in that cluster are accessible from other clusters
By default, a Global Service will load-balance across backends in multiple clusters. This implicitly configures service.cilium.io/shared: "true". To prevent service backends from being shared with other clusters, this option should be disabled.
Pod IP Routing Methods
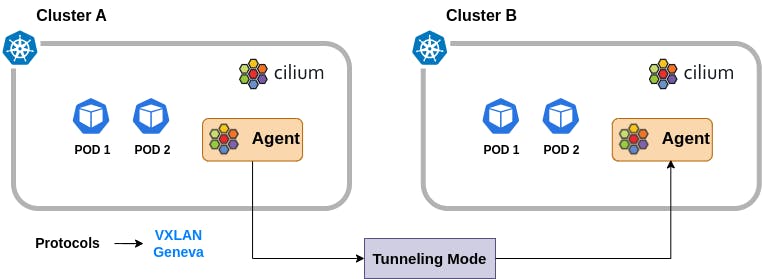
1. Encapsulation
Encapsulation mode in Cilium is the default mode when no specific configuration is provided. In this mode, all cluster nodes create a mesh of tunnels using encapsulation protocols like VXLAN or Geneve. This means that all traffic between Cilium nodes is encapsulated, adding a layer of security.
2. Native Routing Method
In native routing mode, Cilium doesn't rely on encapsulation or tunnelling. Instead, it uses the underlying network infrastructure and routing to enable communication between pods.
3. Hybrid Routing Method
The hybrid-routing mode enables the use of direct-routing when available which will typically be in the local cluster or other clusters in the same VPC with a fall-back to tunneling mode when spanning VPCs or cloud-providers. This can limit the operational complexity and allows to pay the cost of optimization only when needed.
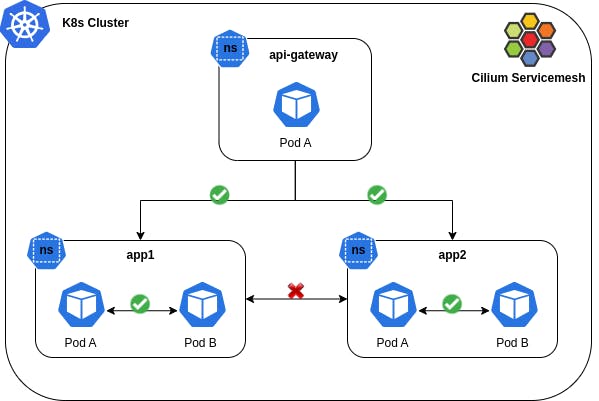
Multi-Cluster Network Policy
Network policies play a crucial role in securing multi-cluster networking. They provide granular control over network traffic, ensuring that communication is both secure and efficient.
Here are some benefits,
Enhanced Security: Cilium's fine-grained control ensures that only authorized communication occurs.
Visibility: Gain in-depth insights into network traffic, aiding in monitoring and troubleshooting.
Improved Performance: Optimized network policies can enhance network performance.
Ease of Use: Cilium's user-friendly approach simplifies policy creation and enforcement.
Scalability: The solution grows with your needs, accommodating multi-cluster environments of various sizes.
Namespace Isolation
As I already discussed this feature in my previous blog, kindly check out here
How to Setup Cluster Mesh?
In my previous blog, I explained how to install Cilium in a cluster check here
Prerequisites
Install the cilium in all your clusters adding this
--set ipv4NativeRoutingCIDR=10.0.0.0/8Store the Kube context inappropriate environment variables as $CLUSTER1 and $CLUSTER2
Steps:
Step 1: Specify the cluster name and cluster ID in each cluster and all the cluster names should be unique.
Step 2: If you want to enable the Hubble Relay across clusters, attach a certificate authority (CA) using below command
kubectl --context=$CLUSTER1 get secret -n kube-system cilium-ca -o yaml | \ kubectl --context $CLUSTER2 create -f -
Step 3: Enable the cilium cluster mesh using the below commands. It will deploy the cluster mesh apiserver and other required components into the cluster.
cilium clustermesh enable --context $CLUSTER1
cilium clustermesh enable --context $CLUSTER2
Step 4: Wait for the cluster mesh status
cilium clustermesh status --context $CLUSTER1 --wait
cilium clustermesh status --context $CLUSTER2 --wait
Step 5: Connect the cluster from any one direction and it will be established in both directions
cilium clustermesh connect --context $CLUSTER1 --destination-context $CLUSTER2
It may take a bit for the clusters to be connected. You can run cilium cluster mesh status --wait to wait for the connection to be successful:
cilium clustermesh status --context $CLUSTER1 --wait
Step 6: Test the connectivity between the clusters using the below command
cilium connectivity test --context $CLUSTER1 --multi-cluster $CLUSTER2
Summary
In closing, Cilium's multi-cluster mesh redefines distributed application networking. With enhanced scalability, improved resilience, and streamlined communication, Cilium emerges as the efficient solution for modern, interconnected environments, marking a significant leap in the evolution of multi-cluster connectivity.
Kindly Stay tuned for more DevSecOps tech trends!!! 🚀😎